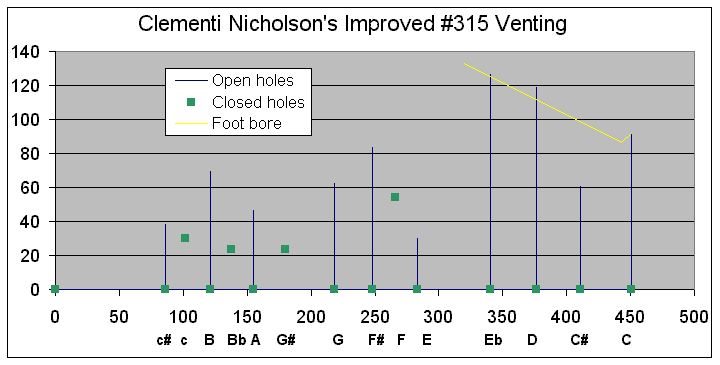
An Introduction to Venting ChartsI've been looking for a way to illustrate the venting of a flute and I think I've come up with something useful. But before we look at it, we'd better define what we mean by venting. Venting?When you play the note G on an 8-key flute, it usually plays very cleanly, with great focus. The A note, by comparison is a little veiled. The E note is much worse, but suddenly comes good when you open the Eb key. What's going on? The difference between these notes is the degree of venting they receive. Look at an 8-key. The first open hole in the note G is fairly large. Just a semitone further down the flute is the even larger F# hole. No wonder G sounds well with this very good level of venting. The first open hole for the note A is somewhat smaller, and the next open hole is the G hole, a long two semitones away. Not so good. E is the smallest hole, and the next open hole is the D hole, often shaded by having a pad looming over it. Again it's two semitones away (more actually - the E hole is always higher on the flute than it should be). Open the Eb key though and you halve that distance, making a radical improvement to venting and therefore the quality of the note. The Venting chartBut how to illustrate that visually? Look at the chart below. It relates to a Clementi Nicholson's Improved, No 315. The X axis (horizontal) shows us the distance from the top of the conical section of the body at the left hand extreme, to beyond the end of the foot on the right hand side. The Y axis (vertical) shows us the cross sectional area (CSA) of the finger holes, in mm squared.
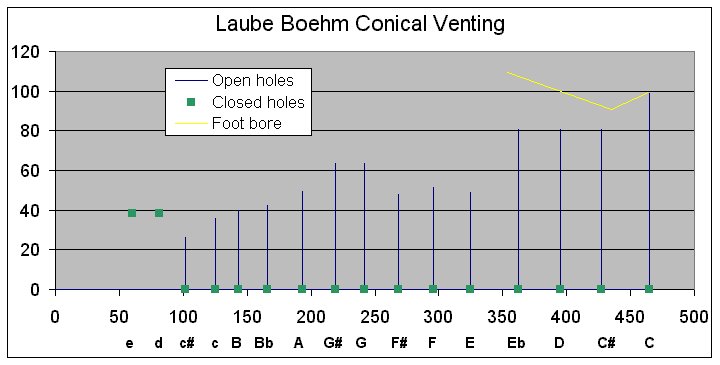
The blue bars represent the normally open holes, giving both position along the flute and CSA. You can see (L to R) the three left-hand holes, the three right hand holes, the three foot keys and finally the hole in the end of the flute. The green markers do the same for the closed holes. The closed keys are (L to R) c, Bb, G# and F. The yellow trace represents the CSA of the last bit of the bore. It obviously meets the top of the last hole as this is the end of the bore. It's interesting to see how much of the bore the foot holes use up. Interpreting the chartEssentially, venting and therefore note quality is improved the closer the first open one for the note played is to the next open hole. It's also improved if either or both of the holes are big. So A is poorly vented, being a small hole with a long gap before the next open one. And G is magnificently vented, being a big hole with a bigger hole just below it. Shouldn't Eb be shown closed?Indeed, Eb is a normally closed hole, but the old makers expected us to keep it open most of the time. So it's fair to regard it as open unless you know it won't be. You can see immediately the effect of leaving Eb closed when playing E. E is that tiny aperture at about 280mm. Being so small, it relies on receiving a lot of help from Eb, the very large hole to its right. Close that hole and the nearest extra venting has to come from D, another semitone to the right. Why separate out the open and closed holes?When considering the venting of say the "everything open" note c#, the four keys below it will all be closed, and therefore not contribute. Unless of course we opt to open c natural. Why CSA?I could have used hole diameters here and got the same general shape. But really the venting is determined not by the diameter of the hole but its area, which goes up at the square of the diameter. So what do we learn?We can see immediately that the holes are not distributed on this flute in a very uniform manner. They cluster into three groups - left hand, right hand and foot. The distance between these clusters is too great, particularly between the central cluster and the foot. This latter clearly relates to flat foot syndrome. We can see also that the four semitones notes in the central cluster are not well distributed - the F to F# semitone being much smaller than the F# to G. Look too at the notes of the foot. Although the spacing seems good, C# (at 415mm) is far smaller than any of the others. Not surprisingly, it's very flat in the original. The closed holes are interesting too - much smaller than the open holes around them. This actually makes sense to a degree, as they pick up the venting support of the open hole just a semitone below. In this case, however, the holes are a little too small, a fact noticeable in a pitch response chart for the flute. An interesting comparisonSo if the early Nicholson's improved has some obvious difficulties in spacing and venting, did anyone get it better? Well, who was the champion of good spacing and full venting? Theobald Boehm, of course. Let's put him to the test. Here's a French-made conical Boehm by Laube:
Well, a very different picture, eh? Firstly notice the full venting (every hole is open apart from the two trill keys at the extreme top. So every note enjoys the assistance of the next hole down (and in theory every hole below that, but the degree of assistance drops off proportionally with distance). Secondly, note the pretty uniform spacing (the lines should get smoothly further apart like frets on a stringed instrument). Thirdly, note the general graduation of hole size from top to bottom. Compare all those issues with the Nicholson's chart above. Three smaller holes?You might be puzzled by the three smaller holes between 250 & 350mm. They are the three ring-keys under your right-hand fingers. Why are they smaller diameter than logic would suggest? Because, being ring keys, they don't have pads looming over them when they are open. So they can achieve adequate venting at a smaller size. We see that principle perpetuated in the perforated plates of some French-style modern Boehm flutes. Two big holes?And why are the two closed holes at the top larger than we might expect? Because they are mounted a lot lower than they should be. They are the trill keys for E and D - the gap between them and the gap between them and the next hole should both be two semitones. "Correct" location would make the amount of tube above them very short however, with implications to pitch stability. So you can break the rules, providing you do it for a good reason and with care! ConclusionMy aim in developing and presenting these charts is to give us a way of being able to see the "signature" shape of a flute's venting, in both hole placement and size terms, without the masking effects of hardware and rotation around the flute. I'll be employing these charts in future analyses of the flutes I'm studying and presenting on these pages. I believe that this chart, or some variant, will prove a valuable tool in analysing the extraordinary development of the flute through its most fashionable period. Use your "Back" button to return to the page you came from, or |

