|
The best laid schemes o' mice an' men gang aft a-gley.
(Robert Burns: “To a Mouse”)
Introduction
In our
previous article, we developed some ways we
might try to coax the LH section of the Potter flute back towards its
undamaged shape. Enough armchair theorising, it's time for action!
Start Plan B
Hey, what do you mean, Start
Plan B? Whatever happened to Plan A?
You'll remember Plan A was:
subject it to some
normal playing, to see if, freed from its tenon wrapping
constrictions, we see it starting to move spontaneously towards one
of the shapes we predicted in the previous articles
But we have a catch.
This flute is not yet playable. It's missing keys, it's cracked
through the barrel and into some of the sockets, it has dodgy brass
rings that are probably crushing the bore near the sockets - this thing
is a basket case! So, if we can't play it, we can't test Plan A.
So we have to bypass that and go on to Plan B. In the meantime, I
can address the issues mentioned above and we'll come back to Plan A.
Start Plan B (take 2)
Plan B was put into force on 11
March 2011, but just on the LH section. This leaves the rest of the flute
as found so we can test Plan A on those later.
The LH section was carefully measured, its one remaining key taken
off and stored, a few extra indicative test points measured and the section
weighed, before subjecting it to an even larger ice-cream tub with damp sponge.
A lot of ice-cream has died in the making of this series!
Two days later,
in went the barrel as well. I realised that I needed to find out what
would happen to the barrel socket. Would it expand enough to allow
a swollen tenon to enter it, or would it blow the bolder scenarios out
of the water?
Time then to settle back; this
was going to take a while! Compared to the test tenon, these
sections have a lot more wood and are going to react a lot more slowly.
The daily ritual
Each morning saw me removing
the flute from the humidity chamber and measuring some key indicators,
and graphing progress.
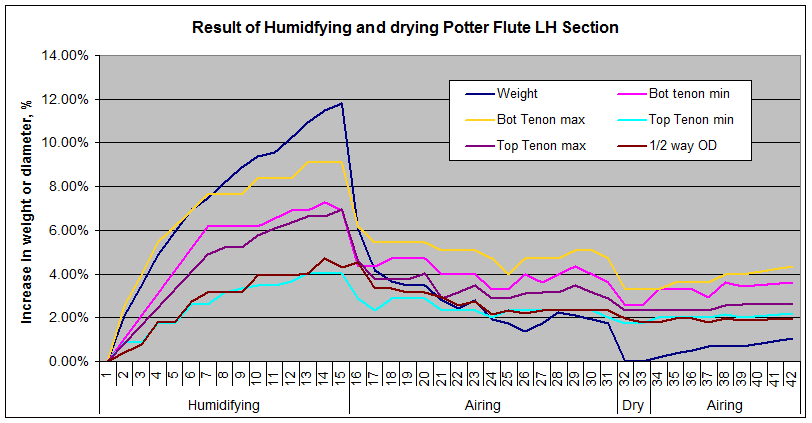
In parentheses are the colours of the traces in the graph below:
-
The weight of the LH
section (in navy)
-
Maximum diameter in the
middle of the top tenon (purple)
-
Minimum diameter in the
middle of the top tenon (acqua)
-
Maximum diameter in the middle of
the bottom tenon (yellow)
-
Minimum diameter in the middle of
the bottom tenon (pink)
-
The outside diameter at a convenient
spot about halfway along the section, just beside the C guide block (brown).
The weight of the section gives
us an idea of how much moisture it has absorbed. I'm measuring the maximum
and minimum diameters of the two tenons as we can expect ovality to kick in
bigtime, and
we'll get very chaotic results if we're not careful to track both axes
separately. The outside diameter near the mid point is to see how much longer the
thicker timber furthest from the tenons takes to catch up.

I've expressed all the
measurements as percentage increase over the value as originally found.
That enables me to display the weight and the diameters on the same
scale, making it easier to follow the action.
The humidification phase
As you can see from the navy
trace, the weight increases rapidly, attesting to how quickly she's
taking on water. The bottom tenon diameters, maximum and minimum,
in yellow and pink respectively, follow almost as quickly.
Interestingly, the top tenon isn't so easily lead. It's maximum
and minimum (purple and aqua) follow at a considerably lower rate.
The outside diameter around the middle of the section (in brown) is also
slow. That's not surprising - we would expect that to be the last
part of the section to react to moisture increase. The top tenon
is more surprising, and we need to put more thought into why it is so
slow to react.
What's the white stuff?
Urk! Day 8 and mould is forming
around the tenons of the flute. I've mentioned in my
article on humidifying flutes the danger of
overdoing it. Sure enough, here we are, overdoing it in the name of
science. Fortunately for me, I have
no immediate plans for playing this flute, and therefore not too much risk of
breathing in large amounts of mould spores! And neither should you.
Be cautious if you're humidifying your flute! For now it will be enough
for me to wipe the mould off each day when I come to measure it.
The Outside of the Hole
Now here's something you
don't see everyday - the outside of a hole! Sounds like a good
name for a tune.
Potter's "Patent
Flute" featured metal valves through out (we now call them pewter
plugs). These plugs operate in conjunction with sleeves in the
wooden body of the flute. On day 10 of the humidification process,
something gave me reason to wonder how airtight the section was. A
quick test on the Magnahelic Flute Leakage Detector indicated it was
hopelessly leaky. But where was all this leakage coming from?
I couldn't see anything wrong. After some elimination, I found the
leakage was via the key holes, or, more specifically, around them.
The wood had expanded so much that the inserts, originally jammed in
tightly, were now loose enough to leak. I removed one for inspection,
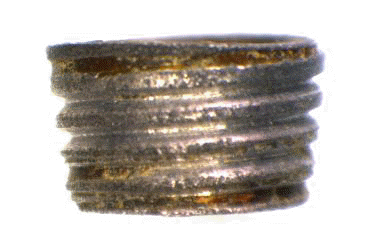
and here it is:
| Note
that it's conical, threaded and screwed into place, and seems
sealed with shellac. Note also that the top isn't flat, but
probably curved to blend with the outside diameter of the body
at that point. I imagine from the appearance that it was
cast, possibly with a screwdriver slot in the top. Screw
it in as far as it will go, then file or turn off anything left
sticking out, including the slot. Then, I imagine, a touch
up with a reamer to give the valve something reliable to mate
with, mount the key with the valve engaged in the hole,
and the job is done. |
 |
I also found another source
of leakage. A small knothole at the back of the left hand section
had been replaced with a blob of boxwood-coloured resin, a not-uncommon
repair for the period. It too was leaking. Ideally, I should
have checked airtightness first, to see if these were "naturally-occuring
leaks", or leaks created by the current cruel and unnatural treatment.
Oh, well, next time.
The Airing phase
By about the 15th day, I
decided enough was enough. Although the weight (i.e. the moisture
content) was still going up a bit each day, the dimensional indicators
were levelling out. So, I pulled the section out of the ice-cream
container, and left it on the workbench to re-equilibrate with local
conditions. Now it has to be said that, at the time, local conditions were a bit
bizarre. Australia is known as one of the driest continents on the
planet, but not this year. We've just battled through 10 to 12
years of drought, under the influence of a long El Niño event, but this year we've moved to a La Niña weather
pattern, with far greater-than-normal rainfall. Workshop humidity
was up around 80%, so the drying rate would be low. Let's take
another look:

As you can see in the gap
between days 15 and 16, the readings all took a plunge, despite the damp
conditions. Because the rate of transfer of moisture from an
object to the environment is proportional to the difference in moisture
content between them, the fastest change occurs at the start. It
is in the nature of such things that one "time constant" will produce a
63.6% change, and five time constants will get within 1% of the final
figure. The "time constant" for this flute section drying out
looks like about 1 day! Certainly, after about 5 days, we start to
see the traces jumping up and down, as random environmental changes take
over from the death plunge.
But, something strange has
occurred. The flute section hasn't dried out to the original
weight, nor to the original dimensions. Look along to day 31, and
you'll see it seems to be settling out to a weight about 2% higher than
original, and dimensions 2 to 4% higher. Aha, you interject, the
weather has simply got a little damper in the meantime. Alas, not
so simple. I've been running a data logger and it confirms that
the weather has got a bit drier in the meantime!
Well, I'm not going to pushed
around by any old flute section - I'm going to get that moisture content
down to the starting point if it kills me. [Fx: Muffled cries,
stage left.] On Day 31 I put the flute in the environment chamber,
set to dry, and leave it there just long enough to get the weight down
to the original value. To be really sure, I pull the section out,
and enclose it in a zip-lock bag for the next two days, to allow the
remaining moisture to equalise in the section. Still showing the
original weight.
But, and it's a big but, look
at the other traces for days 32 and 33. They've stayed up in the 2%
to 3% increased range. Even though we've driven out all the
moisture the flute section had picked up in the humidification process,
all the diameters of the section have increased by 2% to 3%! I had
hoped the crushed tenons might have enlarged a little, and they have,
but the outside diameter of the middle of the section has too!
I couldn't stop there, of
course. What would happen if I now let it re-equilibrate with
atmosphere? I took it out of the bag and left it on the bench for
another 9 days. We can see it reabsorbed moisture from the air,
heading back up toward the humidity it now seems happy with. And
the dimensional measurements followed suit. On the 42nd day, I
terminated the experiment, and settled back to gather my wits.
Both of them.
Hysteresis or hysteria?
Unless I've lost the plot
somewhere, the wood appears to be demonstrating hysteresis, sometimes
referred to as "memory effect" or "path dependence". Essentially,
the state of a hysteretic item cannot be defined entirely by its
current circumstances; you must also take into account how it got there.
If hysteresis is involved in what we just saw, we could
rationalise it thus:
When wood is made very
dry and then allowed to return to normal conditions, it will settle
on one value of moisture content. When it is then made very
wet and allowed to return to the same normal conditions, it will
settle on a different and higher moisture content. In both
cases, the thickness or diameter of the wood will reflect the
moisture content it settles on.
If the results of this early
experiment are correct, the difference between the final moisture content and dimensional values
when approaching from different directions are in the order of 2 to 4%, certainly something
that can't be ignored.
Has this flute experienced
very dry times? Certainly. It had spent many years in
Canada, before coming to Canberra Australia in the middle of a 10 year
drought. And wet times? That's what this experiment is all
about!
Ramifications
But what does that mean in
the flute situation? It would suggest that a flute that had dried out
over a long time would have a narrower bore than one kept in playing
mode. And a narrower bore will exhibit different tuning and
probably performance to a flute with a wider bore. Woah, that's an
experimental outcome that wasn't on the agenda!
So, suddenly our horizon is
widening. An experiment, narrowly focussed on tenon compression,
now has to contemplate, or at least take into account, other
moisture-related effects.
Where are we now?
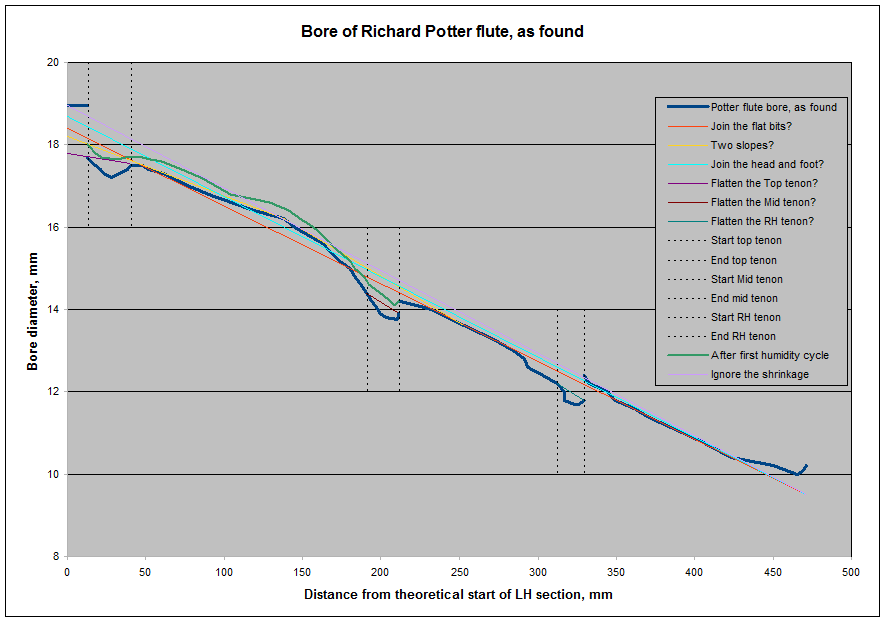
Let's look at where the
bore of the LH section is now, in comparison to where we started out.
In the graph below, the new bore diameter is shown in bold green, with
the old bore in navy.

As you can see, it's essentially the old LH bore enlarged a little.
We still see strangulation at both tenons, although quite a bit reduced.
Indeed, the bore at both ends now lies outside the "flatten the tenons"
scenario. Suddenly, even our boldest scenario, the violet "Ignore
the Shrinkage", looks to be within grasp.
Is this "the shrinkage"?
You'll remember that "the shrinkage" referred to in the "Ignore the
shrinkage" scenario was the apparent shrinkage of the barrel. I'd
estimated that as about 1.5%, given that a 1.1mm crack had opened up in
the wood around the metal liner. You'll remember that, further up,
I'd also consigned the barrel to the horrors of Plan B. My aim was
to see if the mouth of the barrel would open up, to accommodate a tenon
swollen under bold scenario conditions. So, time now to interview
the barrel!
And, sure 'nuff, the mouth of the barrel was now 1.5% larger too, while
the diameter at the back of the mouth was about 1% larger. These
changes restored a better slope to the inside of the socket, as well as
improving its capacity to take a bigger tenon. More support for
the bolder scenarios?
And the barrel?
You'll remember I threw the barrel into the humidification chamber a
couple of days after the head, largely to see if the mouth would expand
a bit, which it did. So what else did we notice on that journey?
Firstly, the crack, which had started at about 1.1mm wide, closed to
about 0.3mm within the first week, and almost closed up by the 10th day.
Secondly, where the ivory ring met the wood, the ivory had been
noticeably smaller than the wood, leaving a ridge you could easily catch
a fingernail on. By about the 12th day, the fingernail seemed
confused. The ivory, once milky white, was now looking quite
translucent. So, the ivory seemed to be absorbing water and
expanding faster than the wood.
Thirdly, it became clear that the barrel wood was growing in length.
This is something we saw in the test tenon, back in Series 1, and is
perhaps something boxwood is prone to. But
the brass liner in the barrel was turned up into a flange at both ends,
and soon the wood ran out of room and started to distort alarmingly.
I turned off the flange at the top end of the barrel to prevent conflict. Losing the flange was inevitable anyway, as the
liner had to come out to permit me to glue the crack closed, and it
couldn't possibly come out with a flange at both ends. If major
re-humidification is called for in future, I'll be removing this flange
up front!
Another cold shower?
Before we get too excited about any of this, and start throwing
innocent flutes into ice-cream tubs full of wet sponges, we
need to take a deep breath. These are very early results, and may
well be negated by further examination. Further, we don't know how
long this new condition will last. Has the humidifying process
"permanently set" the wood in this engorged state, or, over time, will
it slowly regress to the state we found it in? Is this effect
limited to boxwood, or does it apply to ebony and cocus, and even our
modern blackwood? Would simply playing the flute (Plan A) have
achieved the same outcome, or will regular playing maintain it? Is
this what "blowing-in" is? And are the changes a desired outcome,
taking us closer to what Potter intended, or just yet another and more
fantastic distortion visited upon this poor wretched flute? So
many questions! And we still haven't achieved our basic aim, to
eradicate the strangulation, even though we have ironed it out a bit.
But, for all that, you can't tell me it isn't interesting! And it
might represent a temporary derailment of our plans. But, to return
to Rabbie Burn's quote up top, I can handle a bit of a-gley from time to time.
What's next?
Hopefully, in our next episode, we can get back to
testing Plan A - just playing the flute!
On to Plan A, or
Back to McGee-flutes
Index page...
Created 12 May, 2011
|