The Bulge
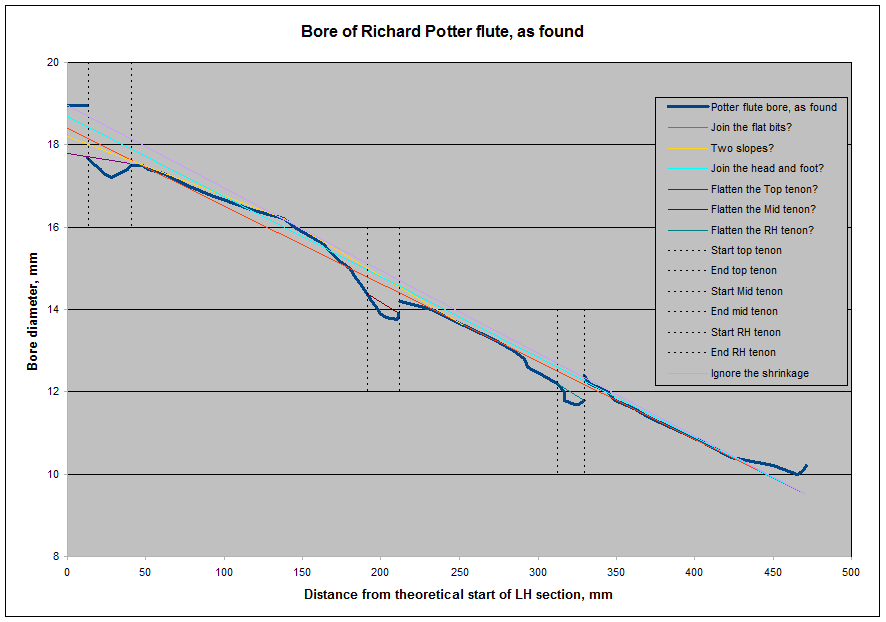
So what is this bulge? You can see it peaking at around X=140mm,
on the thick navy trace on the graph below.

Intentionally making such a bulge in the bore would require the use of a
compound reamer, several short straight reamers or other special tools.
The Experiment
For the experiment, I decided to make a simplified model of a flute LH
section. Like the test tenon in Series 1, it would be made lightly
and treated harshly, in order to get first indications within an
acceptably short timeframe. But, unlike the test tenon, it would
have a central body with a tenon at both ends, just like a real LH
section. To make it easier to track and see changes, the bore and
outside would be plain cylindrical.
I chose a leftover 200mm (8") piece of an Australian acacia, either
Brigalow or Lancewood from southern Queensland. I often use these
species for experimental purposes, such as new models. They are a
little heavier than boxwood, but not as dense as African Blackwood,
cocus, gidgee etc. "Averaged flute wood", if you like. I have made a few full flutes from such
acacias; they work fine and behave as you'd expect.
I bored the piece to head-joint diameter (19mm, 3/4"), then turned the
outside to a nominal 23mm, thus leaving 2mm walls, half the typical 4mm
of a typical flute. That alone should speed up response to
humidity cycling! I turned 21mm OD, 30mm
long tenons on each end. Woah, that's a tenon wall thickness of
only 1mm! On one end I cut a very shallow trough for thread, and
combed the wood beneath. On the other I merely did the combing.
That difference might tell us something.
I wrapped both ends with 200 turns of light polyester-cotton sewing
thread. While 200 turns sounds a lot, it's probably less than
would fit in a typical 19th century flute trough.
Nomenclature
As I measured up the test flute tube for the lab
book, I realised I needed to tighten up on the loose words we often
use to describe flute parts. Let's see if these work for you.
Visualise the LH section of a flute, with a tenon on each end.
In this article, and starting at one end, I'm calling them:
-
the Tip (of the tenon), abbreviated in the graph
coming later as T,
-
the Lapping, abbreviated as L,
-
the Neck, being the last part of the tenon
before it joins the body, N,
-
the Shoulder, being the first part of the body
adjacent to the neck, S,
The only new expression here is Neck, although I'm
also proposing to reserve the word Shoulder for the start of the
body, rather than the neck of the tenon, which is sometimes referred
to as the tenon shoulder. I'll be interested in your reaction
to this terminology. Please feel free to offer alternatives -
we could really benefit from standardising terms for these parts.
Since this piece has two tenons, we have TL & TR, LL
& LR, etc, where the L and R mean left and right. That leaves the remaining parts of the main body of
the piece. Apart from the two Shoulders, I've identified three
other measurement places, the middle, "1/2", and the two quarters
"1/4" and "3/4". That gives us a total of 11 measurement
points.
Ovality
It became very clear in our previous experiments
that ovality is an important part of any wood movement in flutes.
Consequently, I decided to measure both the maximum and minimum at
each point. That now makes it 22 measurements.
Management data
In addition to the diameter measurements, we need to
log some management data:
-
Time of measurement, in case I need to correlate
with the datalogger recording RH and Temperature.
-
Date, to keep track of days elapsed
-
Status - what's been going on, and
-
Weight, being our measure of moisture content.
That brings the daily ritual to 26 data points.
When we multiply that by 18 days of measurements, it becomes 468
physical measurements. Plus designing a spreadsheet to accept,
process and present the data, all that data entry, analysis and
writing up. I sure hope you're appreciative of all this
effort!
Oh well...
The outcome
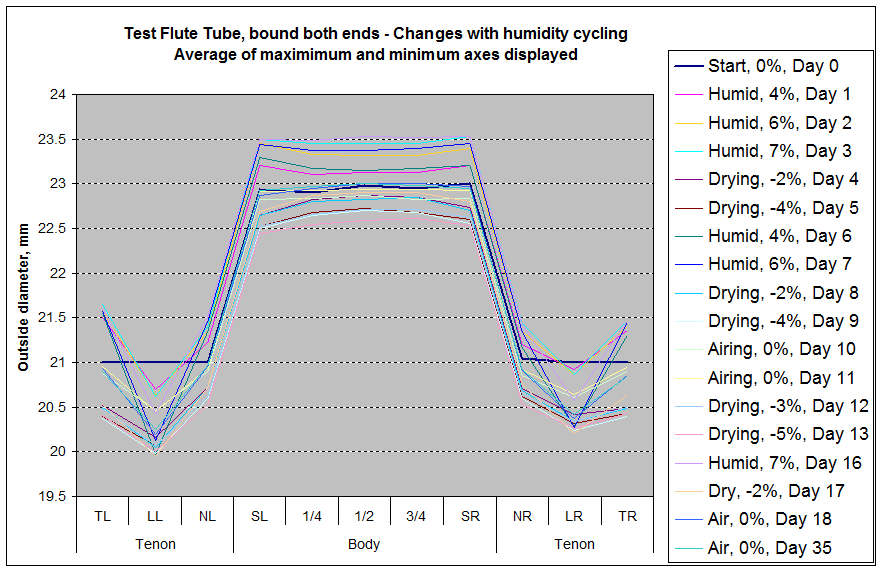
For greater clarity, I decided to manipulate the
mass of data to make it physically represent the object. In the graph
below, you'll see a crude representation of the piece, with the
tenons at each end, and the larger body in the middle. As
discussed previously the L and R tenons are shown as having Tips,
Lapping and Necks. The body has a Shoulder at each end, and between
them we have the 1/4, 1/2 and 3/4 data points.
You'll see that, even despite the simplified representational
presentation, it's a mess of data. Don't panic, we'll cut to
the central story in a minute. Looking down the Legend on the
right of the graph you can see what we did to the poor thing:
-
On day 1, the thick navy blue trace illustrates
what it looked like for a start.
-
Then followed three days of humidification, in
air saturated with water vapour. Weight rose by 7%.
The aqua trace illustrates the result. Note that the body,
tips and shoulders swelled as you'd expect, but the thread
actually compressed the two lapping areas.
-
Then two days of drying in the desiccator,
taking weight down to -4%. Thin brown trace shows the body
curved, with the tenons now heavily compressed.
-
Followed by two more days of humidification.
As the thin cobalt blue trace shows, the tenons are now in real
trouble, but the body is still trying its best to swell.
-
Drying again to -4% in the desiccator, and then
airing for two days to let the piece return to its original
weight and moisture content. The yellow trace confirms the
tenons are now permanently compressed.

-
I decided at this point to up the ante by
rewinding the tenon threads. My first experience as a serial strangler!
-
Two more days drying, followed by 3 days of
humidification. Then nudging the moisture content just below
zero in the desiccator and a day to air brings us up to Day 18.
-
Then, to be absolutely sure it had re-equilibrated
to atmosphere,
a further 17 days lying around on the bench!
The tenons
You'll notice some asymmetry between the Left and Right tenons - the
left being much more compressed. It was the one in which I had cut a
thread trough, whereas the right had one I'd just combed the surface of
the tenon. It confirms the probable - the thinner the wood under
the thread lapping, the more compressed the tenon will be.
(You might be wondering about the intense V shape the tenons appear to
have taken on. That is illusory of course. We only had three
data points in that area - the Tip, Lapping and Neck, so a V shape
is inevitable. In real life, the tenon distortion would be more a
wide shallow U shape.)
It's hard to make out where the tenons ended up in that mash of data, so
let's zoom in on just the tenons and just the first and last days.
Both started out around 21mm as shown in navy in the graph below.
At the end of the experiment, the maximum diameters, minimum diameters
and average diameters are shown in pink, violet and orange respectively.

Just as in the test tenon experiment, we can see that the thread has
compressed the wood under the lapping (LL and LR columns). But we
can also see that the tenons have also gone quite oval (the maxima are
considerably larger than the minima). Is that an artefact of the
tenon wrapping, or has something else caused it? I think we might
want to delve into the matter of ovality in greater depth.
And the body?
Now let's turn out attention to how the central body section fared.
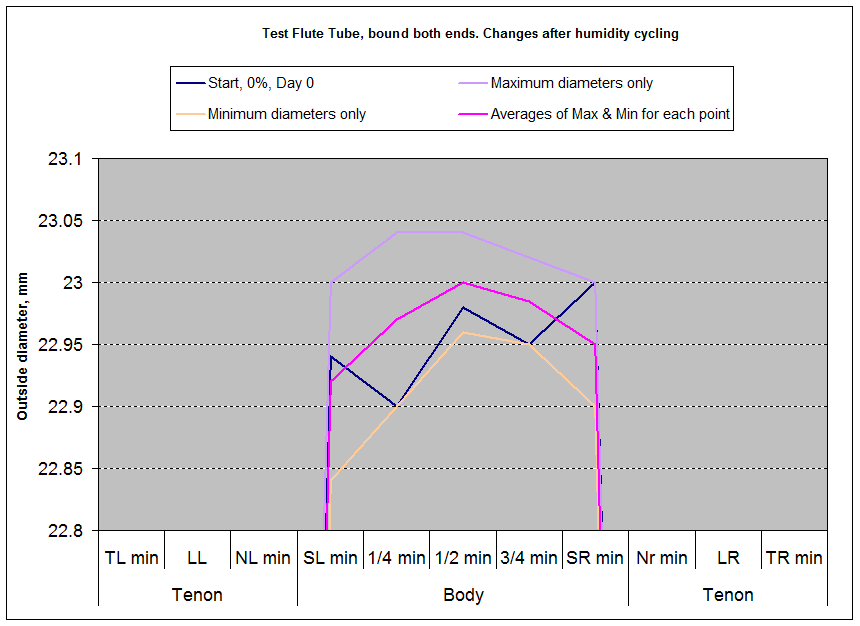
Again we zoom in, and just show the first and last days. The
original dimensions are in navy; the other three traces show how it
ended up. You'll notice that at this zoom level, we can see that
my hand turned cylinder wasn't exactly a perfect cylinder! Boy, it
was quick though!

The pink trace shows the average of the maxima and minima and tells us
what we've suspected. Yes, the compression on the tenons has been
transmitted to the central body and is causing it to now taper mildly in
both directions, from the centre outward. So the bulge in the middle
of the section as we see in the Potter flute can be explained by tenon
compression at both ends.
Indeed, note that the maximum and average measurements at the centre are
now greater than the original diameter at that point, and the minimum
diameter is not much less than the original. Remember the analogy
I'd speculated on in an earlier article? If you support a thin
rule on two pencils 30mm in from the ends (simulating the tenon
shoulders), and then press down 15mm from
the ends (simulating the tenon wrap), what does the centre of the rule
do? It bulges upwards, because the finite stiffness of the rule
won't allow it to just bend meekly over the pencils. So, not only
is our cylinder becoming barrel shaped, the widest point of the barrel
is now larger than originally. It's therefore reasonable to assume
our flute LH might have done the same.
Note also that the left Shoulder (SL) has ended up more ovalled (orange
vs violet) than the right shoulder, SR. Because the Left tenon was
thinner under the wrap and therefore more affected than the right tenon.
You might object that the degree of bulge shown in this graph is not
great, but then the test tube has experienced only a total of 8 humid
days and 7 drying days, the rest of the 35 days being airing.
By comparison, Potter's flute is now up to around 73,000 days.
None the less, we can already see the trend.
Implications
So, getting back to Mr Potter's flute, what does our experiment tell us?
It encourages us to consider the boldest original scenarios, such as
"Ignore the Shrinkage" or even the outlandish "Join the Ends" shown in
the graph below. It suggests to us that the bulge in the middle of
the LH section and the sloping compressions joining the bulge with the
two tenon shoulders are also artefacts of tenon thread compression.
And this would mean that we have seriously underestimated the degree of
strangulation this "moderately strangled" flute has suffered.

Conclusions
This experiment, in
conjunction with what we've learned before, allows us now to explain all the bumps and grinds we see in the LH section of the
Potter flute. Thread wrapping, in conjunction with moisture
cycling, has compressed the tenons dramatically, compressed the
shoulders considerably, and caused a bulge in the middle of the piece.
Thread wrapping is not just a risk to tenons, but to whole flutes.
It also appears to have induced considerable ovalling
at all the points of compression (not just under the tenon wraps).
We need to confirm and explain the ovalling mechanism, and to
consider its significance. That might be best done in a
separate experiment.
What will prove
interesting to see is what happens to that bulge and that ovalling
if we can find a way to reconstitute the LH fully. This story
still has a long way to run.
On to Ovality.htm
or Back to McGee-flutes
Index page...
Created 28 June 2011
|